
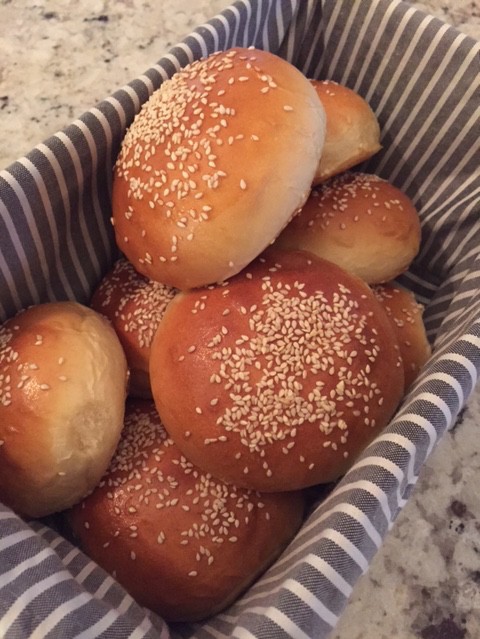
Light-yellow, dense buns for juicy hamburgers and relatively clean hands
Disclosure: Some of the links in this post are affiliate links, meaning that, at no cost to you, I may earn a commission if you click through and make a purchase. Read more here.
Jump to RecipeThese soft buns are perfect for hamburgers, brisket, pulled pork or fried chicken. They hold together much better than regular white buns, including homemade ones, but for sure better than what you get from the super market. With the added eggs, butter and sugar, they have more depth and flavor, and you still know every ingredient that goes in here.


Certain foods release more juices or have more fat, and there’s only so much a piece of bread can take before it falls apart. But there are ways to strengthen the roll a bit, without making it chewy or tough.
Different Types of Bread
In specialty burger restaurants you see different kinds of buns. Flatbread, focaccia, and sometimes ciabatta. Those give an edge to your hamburger experience. However, if you want to go classic, you will have to go for the yellow, large and and slightly sweet rolls. The secret of the ideal burger bun is the use of butter and egg. That will give texture to the bun, making it less likely it will disintegrate when you grab the bun with both hands, and it will soak up the juices from the burger.


Hamburger buns
Ingredients
- 500 grams All-purpose flour
- 230 milliliters Water (Filtered)
- 50 grams Sugar
- 30 grams Butter (good quality, in little pieces)
- 10 grams Yeast (Instant)
- 10 grams Salt
- 1 Large egg
- Sesame seads (Optional)
- Oil to grease proofing bowl
Instructions
Utensils
- Large bowl
- Measuring cup, scale, small bowls
- Dough scraper
- Cling film or lid cover for bowl
- Baking sheet, Baking parchment paper
- Kitchen towel
- Baking brush
Preparation
- Put all the flour in the bowl, and add the salt and sugar on one side of the bowl, and the yeast on the other. When the yeast comes into direct contact with the salt, the yeast loses its effect, and the bread will not proof. Add the water by pouring it over the yeast, and mixing it with your fingers, circling in flour as you go. Add about 75% of the water. Add the egg and the butter, and mix it through the dough. Now, it will become a sticky, messy dough, but don’t worry: it will get into shape.
Kneading
- When the dough has become more coherent and it has picked up all the loose flour in the bowl, turn the bowl over and start kneading on your kitchen counter top. Because of the butter and egg, the dough will be soft and sticky, and you will have smears of butter on the counter top where you knead. It looks horrible. Again, do not worry, as this will be picked up by the ball of dough as you knead along. The kneading will take you anywhere between 8 and 10 minutes. If you feel the dough is too dry or tough, add water by wetting your fingers and knead with your wet fingers. This will give you control, and you will be amazed of the effect on the consistency of the dough by just adding so little water.
- Towards the end of the kneading time, you will see and feel the consistency of the dough changing. It will become smooth, soft and silky. The dough is ready when you can pull the dough apart, and it forms a window of 0,5 centimeters thick without ripping. If it rips to easily, just continue kneading, but not too long. You don’t want to overwork the dough.
First or bulk proofing
- When you are happy with the dough, grease up your cleaned bowl and place in a warm spot to proof. Do not place on direct heat or in the full sun to prevent a skin on the dough. As this dough is pretty heavy on account of the egg and butter, it will take longer to proof: at least one hour. The rise is ready when the dough has doubled in size. Be patient. Under-proofed dough will result in nasty buns.
Shaping and second proofing
- After the hour, scrape the dough out of the bowl using your dough scraper and carefully deflate the dough. Using the dough scraper, cut the dough in 8 (for large buns) to 12 (for smaller buns) equally sized pieces. If you want to go exact, use the scale to weigh out equal buns. The result will be perfectly sized buns. And be careful not to tear the dough, you do not want to rip up the carefully built up gluten. Grab a large baking sheet and line it with baking parchment paper.
- Grab a ball of dough and cup it in the palm of your hand. Make circular movements, allowing the dough to slide over the counter top. After a couple of turns, you will have a smooth ball. Place it on the baking sheet and slightly press it flat. It will rise, and the bun needs to be large, not tall. Repeat for all of the balls.
- Do not strive for perfectly smooth balls of dough. If you roll too long, it will overwork the dough, and make the buns heavy, thick and tough. Just round is good enough. The more you do this, the easier it will get.
- Cover the baking sheet with the kitchen towel and set them apart for the second proofing: that will take an hour. At the end of the proofing time, pre-heat the oven to 200°C/400°F/Gas Mark 6. If you want sesame seeds on your classic burger buns, carefully brush a little water on the buns and sprinkle the seeds on top. If you want to go naked, fine, too.
Baking
- Bake the buns for about 15 minutes. Buns bake quicker than bread because of their size, but these take slightly longer, as they contain egg and butter. They are ready when they are golden-brown on top. Place the baked buns on a cooling rack right away, and with a brush, glaze with melted butter. It is not good for the diet (but this would be the wrong recipe anyway), it gives a rich, satiny crust.
Completing the Hamburger
- This is a baking blog, and not for hamburger patties, but still, a few tips and tricks:
- Search online for grill recipes for hamburger patties and enjoy a hamburger as it was meant to be. Hamburger patties are to be grilled short, on a very hot grill.
- Preparing hamburgers on your Weber or Char-Broil gas grill is called “grilling”. BBQ’ing is what you do with large pieces of meat for hours on end. There is a significant difference. Ask those from Louisiana or Texas, for instance.
- Resist the urge to press down on the patties as they are on the grill. It sounds really good, but you’re actually pushing the juices out of the burger.
- You don’t need perfectly shaped and compressed patties. Actually, ragged edges give more surface to char and caramelize, providing more flavor.
- Cut open the buns and smear a little bit of butter on the inside of top and bottom, and then put them on the grill. Wait long enough for some charring lines of the grill grates: the result is delicious
- A good hamburger is comfort food: do not shy away from overloading your burger, with glazed or grilled onion rings, tomato, lettuce, cheese and a variety of sauces. Paper napkins have been invented purely for grilling soirees.
- These buns are specifically designed to deal with overly juicy, over-loaded hamburgers. They will fall apart at a certain point, but they will hold up longer than either store-bought or fresh made regular, white rolls.